Turning the Parking Tracker Into a 3D Model of My Block
There’s a webcam on my block that counts how many of the seven street parking bays are taken. Now there’s also a 3D model of that block, running in a browser tab, where a car shows up in a bay only when the bay is actually occupied right now.
Ingredients
- The parking tracker — the webcam setup from the last post, which already knows which of the seven bays are taken and shares that as a live data feed (already set up)
- Three.js — the WebGL library that does the drawing. Plain ES modules loaded straight into the page, no bundler (free)
- Its own git repo — kept separate from the tracker so the two can be worked on independently (free)
- ambientCG — CC0 photographed material sets:
Asphalt031for the road,Concrete034for the sidewalks,Grass001for the lawns, each shipping colour, normal, roughness and AO maps (free, CC0) - Sketchfab — where all 22 car models came from. Filter the search to Creative Commons and downloadable; most of my fleet is CC-BY, three are CC-BY-NC-SA. Both licenses require attribution, so the repo carries a
MODEL_CREDITS.mdwith the author, model URL and license for every car — and the NC ones would have to be replaced if this ever became commercial (free, CC-BY / CC-BY-NC-SA) - glTF-Transform — the CLI that makes those models loadable in a browser: weld, simplify, Draco compression and WebP texture re-encoding (free)
- Claude Code — the pair-programmer for all of it. Every module in the scene was written this way, and the prompts that actually worked are in the sections below ($200/yr)
What It Actually Looks Like
The finished thing is a Three.js scene of about a dozen modules, roughly 3.7 million triangles with everything visible, that renders my block live in a browser tab and repaints from the tracker’s live feed.
Open the 3D view and you get my block. Asphalt with tire-polished lanes and oil stains in the parking spaces. Two curbs, with the driveway cuts in the right places. Parkway grass, street trees, the three buildings across the street, a backdrop behind them. You can drag to orbit around it.
And there are cars at the curb. Not decoration — each of the seven tracked bays renders a car only when the live feed says that bay is occupied. If four of seven are taken right now, you see four cars, in those four spots, and the readout in the corner says live · 4/7 bays filled. Come back in ten minutes and it’s different, because the street is different.
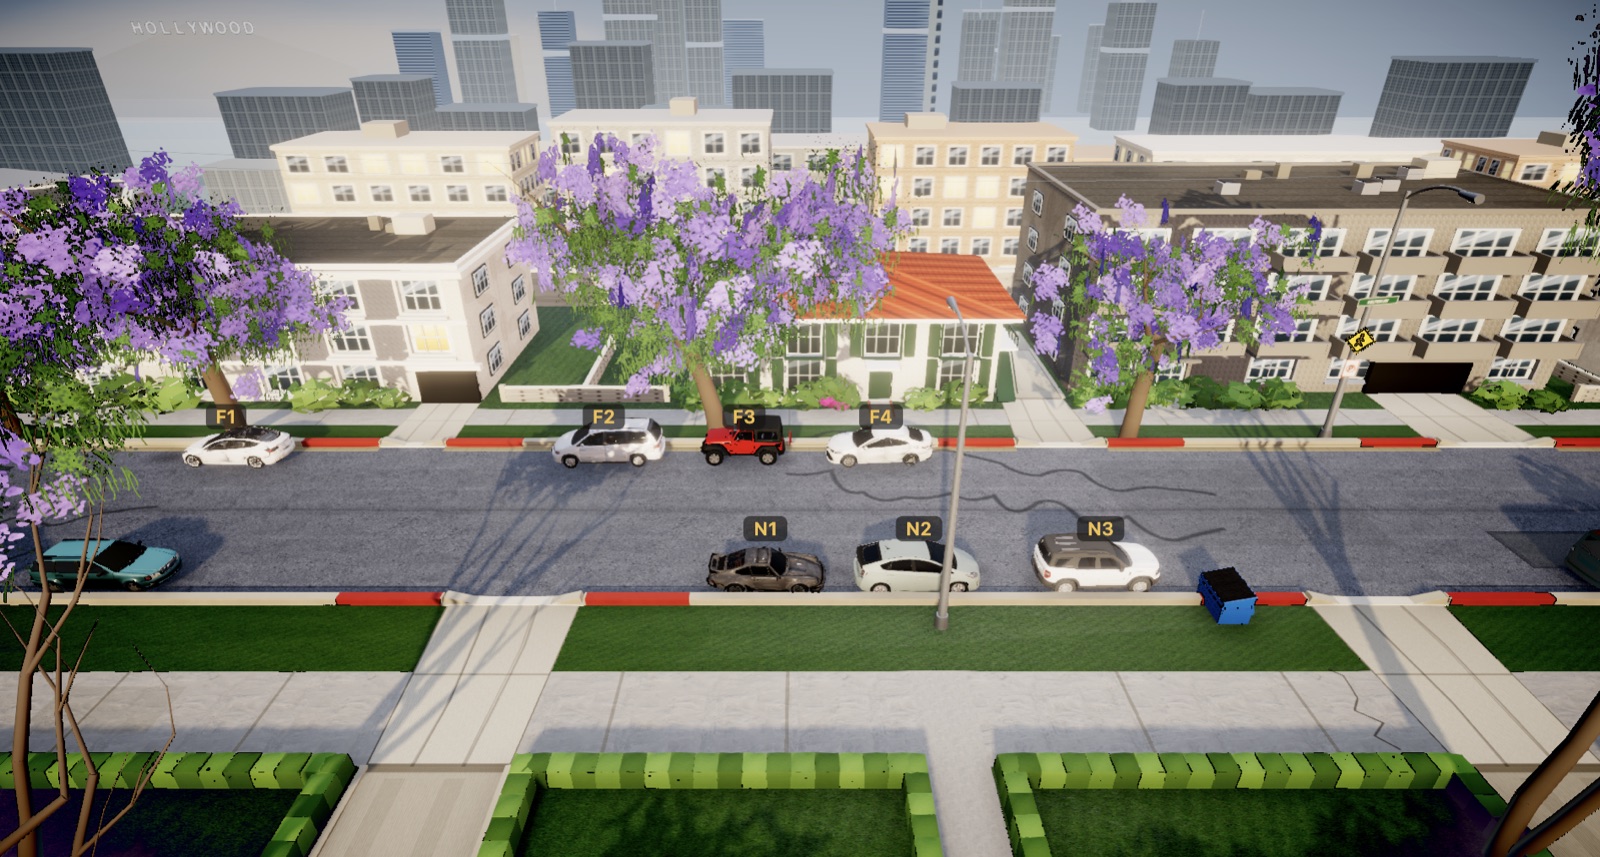
None of it is a game engine. It’s a folder of small JavaScript modules that each build one part of the street, composed by a single entry file and served straight to the browser. Here’s the order it went together in.
Step 1: Write the Street Down as Numbers
I wrote the entire block down as a stack of numbered Z-bands before modelling anything, and that one document is what let ten separate modules agree on where the street is. It also produced the single biggest realism fix in the project: narrowing the road from 45 units deep to 19.
The thing I got most wrong at the start was treating this as a modelling problem. It isn’t. Before anything gets drawn you have to decide where the street is — and then every module has to agree. So the first real artifact wasn’t geometry, it was a comment block: the scene runs along X (down the street) and Z (across it), and the block is a stack of bands in Z, each with explicit numbers. The road runs Z −30 to −11. The near sidewalk is −5.5 to 0.5. Every module reads those numbers instead of inventing its own.
That spec is where the realism win came from, and it was arithmetic, not art. The first version had a road 45 units deep. It looked wrong in a way I couldn’t name for days, until I counted car widths: the street read like ten lanes across. A real residential block here is two travel lanes plus one parked lane at each curb. Pulling the far side 26 units toward the camera took the road to 19 units deep, and the scene stopped looking like a boulevard. Every far-side element then had to shift by that same +26 — the far parkway, the hedges, the building facades, the treeline, the streetlight, the far parked row — which is exactly the kind of change a written-down spec makes survivable instead of fatal.
This is also the first place Claude Code earned its keep, and the prompt is worth copying because of what it asks for: not geometry, but a contract.
The most useful prompt in the project asked for a document, not a mesh. Every later module was written against it.
🔧 Developer section: The world band spec
- Wrote a
WORLD BAND SPECcomment block atopground.js: far sidewalk-36.5..-33.5, far parkway-33.5..-30, road-30..-11, near parkway-11..-5.5, near sidewalk-5.5..0.5 - Named the owning module for each band in the spec —
grass.jsfor parkways,houses.jsfor frontage — so each could be rebuilt alone - Narrowed the road by moving the far curb
-56→-30: a flat+26in Z applied to every far-side element - Left the near curb at
z=-11deliberately — re-deriving the side closest to the camera would have invalidated all the foreground work - Missed one:
camXZ()inshared.jswas frozen, never re-calibrated, and still maps far bays toz≈-50— 20 units past the new curb
Step 2: Lay the Ground
I built the road, sidewalks and curbs as three flat planes and a set of curb boxes, then layered nine wear decals on top. Swapping the flat grey planes for real photographed material sets was the single cheapest believability upgrade in the project — one afternoon, zero modelling.
With the bands settled, the ground is almost boring: one flat plane per band, 240 units long, rotated flat and positioned at that band’s centre. Asphalt for the road, concrete for the sidewalks, grass in its own module.
The surfaces are real photographed material sets — colour, normal, roughness and ambient-occlusion maps from ambientCG, all CC0. That’s the highest-leverage free upgrade in the entire project. A flat grey plane looks like a prototype; the same plane with a real asphalt material on it looks like a road, for no modelling work at all.
What sells it after that is the wear, and every mark is a translucent flat decal drawn over the road in a stacked order: tire-polished bands down each travel lane, sun-bleached patches with a soft radial falloff, a fresher repave rectangle, tar-snake cracks from a procedural squiggle texture, and oil stains sitting exactly where cars park. I spent longer on the bleached patches than I’d like to admit — the first version had such a wide, soft falloff that it read as fog hovering over the road.
The curbs are the detail that matters most later. They’re not one long box: each curb is a series of segments with gaps where the real driveways are, because a driveway means the curb is physically cut. Those cuts become no-parking zones for everything downstream — parked cars, ambient traffic, the red curb paint — so the geometry and the rules stay in sync by construction rather than by me remembering.
🔧 Developer section: Ground, curbs and wear decals
- Built each band as
PlaneGeometry(240, z1 - z0)rotated-Math.PI / 2—strip(-30, -11, asphaltMat)is the entire road - Loaded the ambientCG colour maps in
SRGBColorSpaceand the normal, roughness and AO maps inNoColorSpace. Reversing that washes the scene out - Forced
texture.channel = 0on the AO map — three.js r152+ defaultsaoMapto UV channel 1, so it silently did nothing - Stacked the wear decals with
depthWrite: false, an incrementingrenderOrder, and each one nudged0.004higher in Y so they never Z-fight - Built curbs as
BoxGeometry(x1 - x0, 0.5, 0.6)segments — three on the near side, four on the far, with the gaps at the real driveway cuts
Step 3: Build Upward From the Bands
I split everything above ground level into one module per subsystem — lawns, buildings, trees, hedges, palms, street furniture, backdrop — each reading the band spec and owning nothing else. The payoff was being able to rebuild the building facades four times without touching a single line of road code.
Everything above ground level hangs off the same spec, which meant each piece could be its own module and I could work on one without breaking the others.
- Lawns — the parkway and frontage strips, using a real CC0 grass material with a hand-drawn overlay multiplied on top (tonal blotches, mow stripes, a worn dirt line along the curb) so a tiled texture stops reading as tiled.
- Buildings — three facades modelled from reference photos, each with its own style of window and roofline. Their windows are punched, not painted on — the facade is a slab with real holes cut through it and the wall pulled back behind, so glass sits recessed and catches shadow. I tried the cheap way first, gluing glass planes onto a solid wall, and it renders flat every time.
- Trees, backdrop, street furniture — a shared three-tier branch builder grows the wood and anchors each crown to its own branch tips; behind that, sky, fog, a treeline and distant towers for depth (where bug one lives); in front, a hydrant, a bin, a pole and wires, which are small and without which the frame looks unfinished.
The facades are the part worth stealing, and the prompt is the whole trick. The naive version — a solid wall with glass rectangles pasted on it — renders flat and dead at any distance, because real windows read as windows by virtue of sitting in a hole with a shadow in it. Asking for genuine holes changes the whole look.
Naming the actual three.js primitives (Shape, Path, ExtrudeGeometry) is what separates a usable prompt from “make me a building.”
Step 4: Light It With the Actual Sun
I wired the sun’s position to the street’s latitude and the system clock, so the twin’s shadows match the real shadows at that hour on that date. It costs about forty lines of solar-position math and it is the cheapest thing in the project that makes it feel like a specific place.
Lighting is an HDRI environment for soft ambient light plus one directional sun for crisp shadows, with filmic tone mapping over the top. The part I like: the sun’s position isn’t a setting. It’s computed from my street’s real latitude and longitude and the current clock, using standard solar-position math. So shadows in the twin fall the way shadows on my actual block fall, at that hour, on that date — and after sunset the scene goes to night with streetlight pools.
Concretely: the rig loads venice_sunset_1k.hdr through three.js’s RGBELoader, runs it through PMREM for the environment map, and adds a DirectionalLight with a 4096×4096 shadow map plus a HemisphereLight for fill. The solar math is the standard NOAA/SunCalc formulation — mean anomaly, ecliptic longitude, declination, hour angle — evaluated against 34.0538, -118.4431. Renderer is on ACES filmic tone mapping with a per-mode exposure, and the composer chain adds ambient occlusion, a restrained bloom, a vignette-plus-saturation pass and anti-aliasing — each one wrapped so that if it fails to load, the scene degrades to a plain render rather than a black frame.
There are URL overrides for golden hour, noon or night so I can check the scene without waiting for the weather, but the default is the real sun — and that mattered more than shadow quality did. A model of a place that’s lit like somewhere else stops feeling like that place.
Step 5: Get Real Cars Into It
I replaced my hand-built parametric cars with 22 real Creative-Commons models from Sketchfab and put them through a decimation pipeline that took the Porsche from 16 MB to 1.6 MB — the whole fleet now loads in about 16 MB. Then I had to write a normalisation pass, because 22 models from 22 authors agree on nothing.
I built parametric cars first — bodies assembled from numbers — and they were fine, and they cheapened the whole thing. Real downloaded models were a big step up, and they brought the entire second half of this post’s problems with them.
Raw Sketchfab models are far too heavy for a browser tab — the Forester source is about 480,000 triangles across 162 meshes, and the Porsche was 16 MB by itself. A build script runs every model through the same pipeline: weld vertices, simplify toward a shared triangle budget, then compress geometry with Draco and re-encode the textures. That Porsche comes out at 1.6 MB and the whole fleet lands around 16 MB.
🔧 Developer section: The glTF decimation pipeline
- Ran three glTF-Transform stages per model:
weld→simplify --ratio $ratio --error 0.05 --lock-border false→optimize --compress draco --texture-compress webp --texture-size 1024 - Passed
--simplify falsetooptimize— otherwise it re-simplifies at its own ratio and silently undoes the per-model math - Set
TARGET=25000triangles and derived each model’s ratio from its own source count, so a 480k Forester and an 8k pack car both land near budget - Chose Draco over KTX2 (
DRACOLoaderwas already vendored) and WebP becauseGLTFLoaderdecodesEXT_texture_webpwith no extra loader - Assumed a per-car mesh merge would help, measured, found the lite cars already 3–30 meshes and the draw calls environmental. Reverted it
Then each model has to be normalised, because downloaded assets agree on nothing. My scene’s convention is: length along +X, width along Z, wheels at zero. Getting an arbitrary .glb into that convention is four steps at load time.
- Straighten it. Some models sit at arbitrary angles in their source file — one generic-car pack had bodies at roughly 30–45°, which made their axis-aligned boxes come out nearly square (a minivan measured 8 long by 7 wide instead of ~3.3 wide). Rather than guess,
bestYaw()brute-forces it: sample the model’s points, rotate through 90 candidate angles at 2° steps across a half-turn, and keep whichever maximises length-on-X minus width-on-Z. A car is longer than it is wide, so the narrowest footprint is the straight one. That took every pack car’s width from 4.6–7.0 down to 2.9–3.4. - Point the nose the right way. Straightening gives you an axis, not a direction, so a
HERO_YAWtable carries a hard-codedMath.PIfor the handful of models whose nose is baked toward −X. - Scale it to life size. Each model is scaled so its X-length matches
modelLen(key), which comes from the real car’s published length in millimetres. That’s why an F-150 renders 21% longer and 42% taller than a Camry beside it — the relative sizes are real, not eyeballed. - Sit it on the road. Centre it in X and Z, then subtract
box.min.yso the lowest point touchesy = 0. - Correct the width. Several models render far wider than the real car (fat wheel arches, oversized mirrors), which bloats the footprint and the cast shadow. The fix narrows world-Z toward the spec width plus a mirror allowance — and it’s applied to an outer wrapper group, because the inner car may have been yawed 90° by
bestYaw()and scaling it directly would hit the wrong axis. - Calm the paint. Marketplace car models often ship as near-mirrors and blow out into white blobs under a bright sky HDRI. You can’t recolour them — the paint is a baked texture, not a material factor — but dropping
envMapIntensityto0.3, cappingmetalnessat0.35and flooringroughnessat0.55fixes the glare. Anything withtransmissionor transparency is skipped so glass stays clear.
Step 6: Put the Right Cars in the Right Places
I mapped the tracker’s camera-pixel bay polygons onto the world ground plane, then threw away the raw positions and packed the bays nose-to-tail instead. All seven now sit between 0.03 and 0.07 units past their curb face, which is about where a real parked car sits.
The tracker knows where its parking bays are, but it knows in camera pixels — each bay is a polygon drawn on a 1920×1080 frame. So there’s a small mapping function that turns a pixel position into a position on the world ground plane, and each bay’s polygon centroid becomes an X position along the street.
That gets you approximately right and visibly wrong, because perspective squashes the far end of the frame: bays that are genuinely a car-length apart on the real street come out bunched or smeared. So on top of the raw positions there’s a packing step. For each side of the street, take the bays in order, lay them out nose-to-tail with realistic parallel-parking gaps, and keep the run clear of the driveway cuts and red curb. If a run doesn’t fit the curb available, the gaps tighten rather than letting two cars overlap. Across the street it’s the curb that decides: each car is seated so its curb-side edge sits a hair past the curb’s road-facing face, which — because a curb is a box with thickness — is not the same as the line the curb is centred on. That distinction cost me an evening later.
The specifics, if you want to reproduce this on your own street. The mapping is a two-term linear fit, camXZ(cx, cy), calibrated by eye against two known rows: x = (cx / 1920 - 0.5) * 110 and z = 0.0889 * cy - 74.9. The seating constants are CURB_FACE = { near: -11.3, far: -29.7 } — the two curb centre lines of -11 and -30, each offset by half of the curb’s 0.6 depth — plus a hairline CURB_OVERHANG = 0.05 applied with the opposite sign on each side, since the two curbs face each other. Half-widths come from the model’s bounding box but are capped at HW_CAP = 1.8, because one outlier body measuring wide could otherwise shove itself a full car-width into the road.
Handing Claude the endpoint’s actual shape and two calibration points produced a working mapping first try. The last paragraph is what stopped it from helpfully doing the placement wrong.
One honest caveat about that mapping, since it’s the piece most likely to bite anyone copying this: mine was calibrated before I narrowed the road, and I never re-derived it. It still maps far detections to about z = -50, which is 20 units past where the far curb now lives. The packing step papers over it by overriding the far bays’ X positions by rank rather than trusting their centroids — which works, and is exactly the kind of compensating hack I complain about elsewhere in this post. If I were starting over I’d re-calibrate camXZ and delete the override.
Step 7: Wire It to the Live Feed
I wired the scene to the tracker’s existing live feed, with a strict occupancy gate so a bay renders a car if and only if the feed says it’s occupied. This is the smallest piece of code in the project and the only one that makes it a twin rather than a diorama.
The scene regularly asks the tracker for three things: the bay geometry (fetched once and cached, since it doesn’t change), the current parking state, and the live frame state. Then it reconciles what’s in the scene against what came back.
The rule for a tracked bay is deliberately strict: render a car if and only if that bay’s live state says occupied, coerced to a real number first. That sounds paranoid until you picture the failure mode — a feed that sends the string “0” is truthy in JavaScript, and a loose check would quietly park a car in every empty bay and show a permanently full street. The entire value of the thing is that it says 1 of 7 when it’s 1 of 7.
Each bay also keeps its identity: a given bay always gets the same model and paint colour, derived from its index, so the street stays stable instead of reshuffling its cars on every refresh. Bays are labelled N1 to N3 and F1 to F4 with tags projected from their 3D positions onto DOM elements floating over the canvas.
🔧 Developer section: The live endpoint contract
- Fetch the bay geometry once into a module-level cache; poll the occupancy and frame state on a short
setInterval - Read occupancy as
Number(st[i].occupied) > 0, not truthiness — the JSON string"0"is truthy and would render a permanently full street - Wrapped the poll in a
try/catchthat does nothing on failure, so a dropped request holds the last good frame instead of emptying the street - Hid any projected label with
z > 1— bays behind the camera otherwise render their tags mirrored back into the frame - Piped
errorandunhandledrejectioninto the canvas status line; a throwing WebGL scene is otherwise a silent black rectangle
Three reads and a reconcile loop. The tracker feeds the twin; the twin never talks back.
One softer touch: the rest of the block, beyond the seven tracked bays, gets ambient parked cars whose density scales with the tracked occupancy. Those aren’t data — they’re cheaper generic models filling untracked curb so the street doesn’t look abandoned on a quiet afternoon. The seven tracked bays keep the detailed models and stay the only honest signal in the frame, a distinction I wanted living in the code rather than in my head.
Step 8: Serve It With No Build Step
I gave the twin its own repository and served its modules with caching turned off. There is no bundler and no build: I edit a module, reload the tab, and the change is on screen.
The twin lives in its own git repository, with Three.js provided through the page’s import map. The coupling is one-way on purpose: the twin reads the tracker’s live feed, and the tracker imports nothing from the twin. So I can rewrite the detection code without touching the 3D scene, and rebuild the scene without touching anything that watches the street. And there’s no build step at all — edit a module, reload the tab, the change is on screen. For work that is almost entirely “does that look right yet,” deleting the build was worth more than any tooling I could have added.
What Went Wrong Along the Way
That’s the build. This next part is where the time actually went. Skippable if you came for the recipe.
The invisible glass towers
Some backdrop towers rendered as blank pale slabs while the masonry ones beside them kept their window grids, and the texture turned out to be fine — 8-pixel panes with faint mullions, which looked great zoomed in and was exactly the problem. Those towers occupy a few dozen pixels of screen, so every band of the pattern landed smaller than one pixel, and a GPU that can’t draw a feature that small averages it instead — the average of pale glass with faint mullions being flat pale colour. The fix was to pick the pitch from the measured on-screen size rather than from how it looks up close: a coarse 32-pixel pitch that works out to about 2.6 pixels per band, where a middle version at roughly 1.3 looked perfect in a screenshot and shimmered the moment anything moved.
The bounding boxes were lying
Cars were rendering slightly small, and some hovered above the road — which, from a high camera angle, doesn’t read as floating at all, it reads as parked in the wrong space, so I spent days trying to fix my parking geometry. The cause was that Three.js’s bounding-box helper defaults to a fast path that boxes each part’s own local box and transforms the corners, which over-reports for any model whose parts carry rotations, and several of mine do: scaling divided by an inflated length, and ground-seating subtracted an inflated bottom, lifting each car by exactly the error — one floated 1.55 units, another 2.90. The fix was one optional flag that makes it walk the real vertices, passed at all eight call sites; and once the cars landed, one of them turned out to have been parked backwards the entire time, a bug I’d never seen because a car hovering three units in the air is so obviously wrong that nobody checks which way it’s pointing.
Both of these were measurement problems, not rendering problems. The renderer did precisely what it was told; it was told the wrong numbers.
Which changed how I prompt for debugging. My old habit was to describe the symptom and let Claude propose a fix, which reliably produces a plausible constant adjustment that hides the bug. Now I explicitly forbid that in the prompt and ask for instrumentation instead — this one found the bounding-box problem in a single pass.
The two load-bearing lines are “do not adjust any constants” and “tell me which measurement disagrees.” Without them you get a fix that works and a bug that stays.
What went fast
- The street itself — once the band spec existed, road, curbs, sidewalks, lawns, trees and buildings went up module by module and mostly looked right the first time. Geometry is the easy part.
- Free CC0 materials — swapping flat grey planes for real photographed asphalt, concrete and grass sets was an afternoon and did more for believability than anything I modelled by hand.
- Wiring the live data — because the tracker already exposed its state as a live feed, the twin just reads it. Three reads, a short poll, one reconcile function, and no build step to slow down iteration.
What needed patience
- Normalising downloaded models — 22 assets from 22 authors agree on nothing: scale, orientation, up-axis, even what counts as part of the car. The fix was always the same, and it was never a rendering change: stop trusting the file and measure it myself.
- Trusting library defaults — the bounding-box helper has a fast path and an accurate path, and the fast one is the default. Reasonable for the library, expensive for me. I lost days to a number I never thought to question, because it came from a function whose whole job is returning that number.
- Believing still frames — the in-between texture looked good in a screenshot and fell apart in motion; the floating cars looked mis-parked from one angle and obviously airborne from another. And every one of these bugs had a tempting numeric workaround that would have made the picture look right while leaving the cause in place. I shipped one of those before I found the real problem underneath.